
|
|
|
 A clean car is a happy car! And they just seem to drive better when they're spotless and beautiful, don't they? Here are some cleaning tips for car owners: Interior Tips The three basic steps to interior detailing are vacuuming, cleaning, and conditioning/protecting. Vacuuming - Always begin interior cleaning with a thorough vacuuming. Use a crevice tool for hard-to-reach spaces and a small carpet brush to loosen dirt and lift matted carpet-pile. A softer round brush works well on the seats. Cleaning - After vacuuming, clean all seats, headliner, dash and door panels. If you're using interior cleaner, be sure to check for color fading on hidden areas first. If there's any discoloration, use a very mild soap and water solution instead. Conditioning & Protecting - After you've cleaned your interior, treat all interior vinyl and rubber with a good quality interior solution treatment, such as Meguiar's or 303. Also do the dash every couple of months to prevent drying and cracking. These treatments leave a rich, natural gloss to treated surfaces without leaving an oily film. Special Tip Vacuum the interior before anything else, for these reasons:
Glass Tips Always clean your windows with towels or rags used only for cleaning windows. Residue from waxes and protectants just adds to the problems of getting glass completely clean. Light-duty household cleaners don't cut through residue - the resulting smears and streaks will leave you climbing in and out of your car, cleaning your glass until it's streak-free. Car Washing Tips For the most effective and efficient car washing, follow the directions on your car wash product and keep these tips in mind:
Special Tip On vinyl and convertible tops in need of deep cleaning, wet the top and entire car. This will help dilute excess cleaner that might strip your wax. Use a scrub brush and a good spot remover to loosen and remove embedded soil. Dry with a towel before rinsing to minimize cleaner runoff, then rinse thoroughly. Do not use spot removers or heavy-duty cleaners on metallic-colored vinyl tops. These tops are usually painted, and can be easily damaged by detergents and scrub brushes. Water Spots Water spots are simply salt and mineral deposits that are left behind when water evaporates. These salts stick to paint and glass and can be extremely difficult to remove if they remain for any length of time. Sometimes they can be permanent, especially in glass. Prevent them by drying the car immediately with cotton terry cloth towels. Car Waxing Tips While the basic purpose of waxes and polishes is to put a protective layer between your paint and the elements, most of us wax and polish our cars for a far more obvious reason - great looks. The best results are achieved by adding both depth and gloss to your finish.
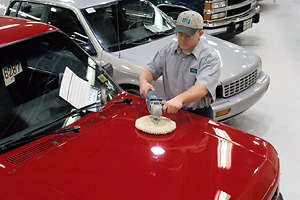
Power Buffer & Polisher Tips If you choose to use an electric buffer to apply wax or polish, avoid the professional type with 2 handles at 90-degree angles. These spin at 2600 RPM or more and can burn right through your paint if you're not extra careful. Random orbital polishers are a better choice. They're less likely to damage your paint because they turn at a lower speed and rotate in an eccentric circular motion. It's still important, however, to be careful - especially around peaks and creases where the paint is usually thinner and more vulnerable. Use masking tape in these areas to avoid problems. Trim & Metal Tips For plastic trim, taillight lenses and other exterior plastic, use a specific plastic polish to fill fine scratches and add an exceptional luster and shine. Use it on dashboard plastic, too. Detail Your Trim First One of the biggest problems with detailing your car is treating your side moldings and plastic trim. While most people do this last, try applying a good trim restorer while the wax is hazing. This way when you wipe off the wax or polish, any dressing on the paint will be wiped off with the wax. Maintenance Tip Once you've thoroughly detailed your car, you can maintain its appearance simply by taking a car duster and letting the fibers loosely hang down on the surface of the paint. Gently wipe back and forth without letting the weight of the brush create excessive pressure. This method is very effective for removing dust without scratching. |
|
Don't miss our monthly SPECIALS! |
